MIL-DTL-642/3B
Inches
mm
Inches
mm
Inches
mm Inches
mm Inches
mm
.002
0.05
.020
0.51
.250
6.35 .4375
11.11 .750
19.05
.003
0.08
.093
2.36
.296
7.52
.448
11.38 .776
19.71
.005
0.13
.175
4.45
.370
9.40
.500
12.70 1.562
39.67
.008
0.20
.187
4.75
.390
9.91
.523
13.28 1.625
41.28
.015
0.38
.218
2.54
.437
11.10 .550
13.97 2.500
63.50
NOTES:
1. Dimensions are in inches.
2. Metric equivalents are given for information only.
3. Unless otherwise specified, tolerance is �.010 (.25mm).
4. After assembly, the eccentricity between the end of the shank and the tip of the plug shall not exceed
.008 inch (.20mm) total indicator reading (TIR).
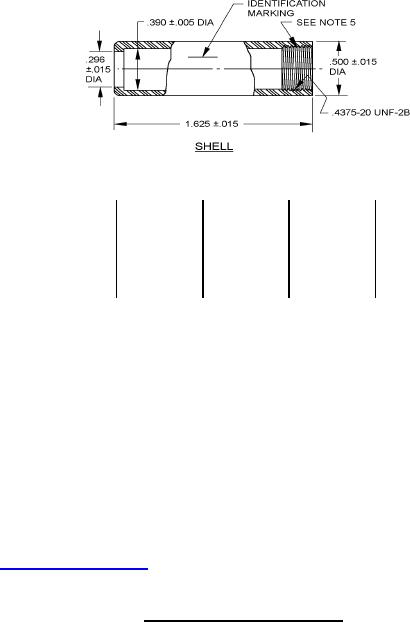
5. There shall be a sufficient length of thread on the shell to assure a minimum thread engagement of
four full threads between the shell and the body of the plug after assembled. When the plug shell and
body are assembled, the shell shall not protrude beyond the shoulder of the plug.
6. Details of this assembly shall be in accordance with drawings referenced herein and may be obtained
online from https://cecom.army.mil/ or from US Army Communications-Electronics Command, 6002
Combat Drive, Aberdeen Proving Ground, MD 21005.
FIGURE 1. Dimensions and configuration - Continued.
REQUIREMENTS:
Dimensions and configuration: See figure 1.
Shell shall be plastic in accordance with MIL-DTL-642.
Terminal screws shall be .086-64 UNF-2A in accordance with MIL-DTL-642/12.
One cord clamp in accordance with Signal Corps drawing SC-A-7674 shall be supplied with each plug.
2